Every Quire project is a git repository hosted on GitHub at Getty’s main organizational account. Most projects also include a secondary images repository for third-party assets. Quire project repositories are then set to deploy on Netlify both for previewing Quire sites during development and for the final publications. The following sections will walk you through how to set up this stack.
Create a Project Repository
-
Generate new project with
quire new project-name. Theproject-nameshould reflect the final URL of the book, which should always be lower case with hyphens between words. (The exception is for the Getty Research Journal where when the URL is structured aspublications/grj/19/and the repo name would begrj-19.) Publication URLs must be agreed upon in advance with Editorial. -
Start Git LFS tracking for EPUB and PDF files with
git lfs track "*.epub"andgit lfs track "*.pdf". Commit the resulting.gitattributesfile. If the project will not have a sub-module images repository as described below, also add Git LFS tracking for all image files as well. -
Run
quire previewto ensure the project was generated and runs as expected. -
Publish the repo to thegetty GitHub organization. Make sure that the repo is set to private. For the description, write ““Publication Name,” by Publication Author”.
Be sure never to commit third-party licensed images, fonts, or other assets to this main project repository, as the repository will eventually be made public. See below for how to handle these third-part assets.
Create an Images Repository
For projects that will include third-party licensed images that are not included in the publication’s default Creative Commons license, a private images repository must be set up. This repository is then added to the main project as a submodule and remains private even after the project is published and the main repository is made public. This same technique can be used to include font files or other third-party assets.
-
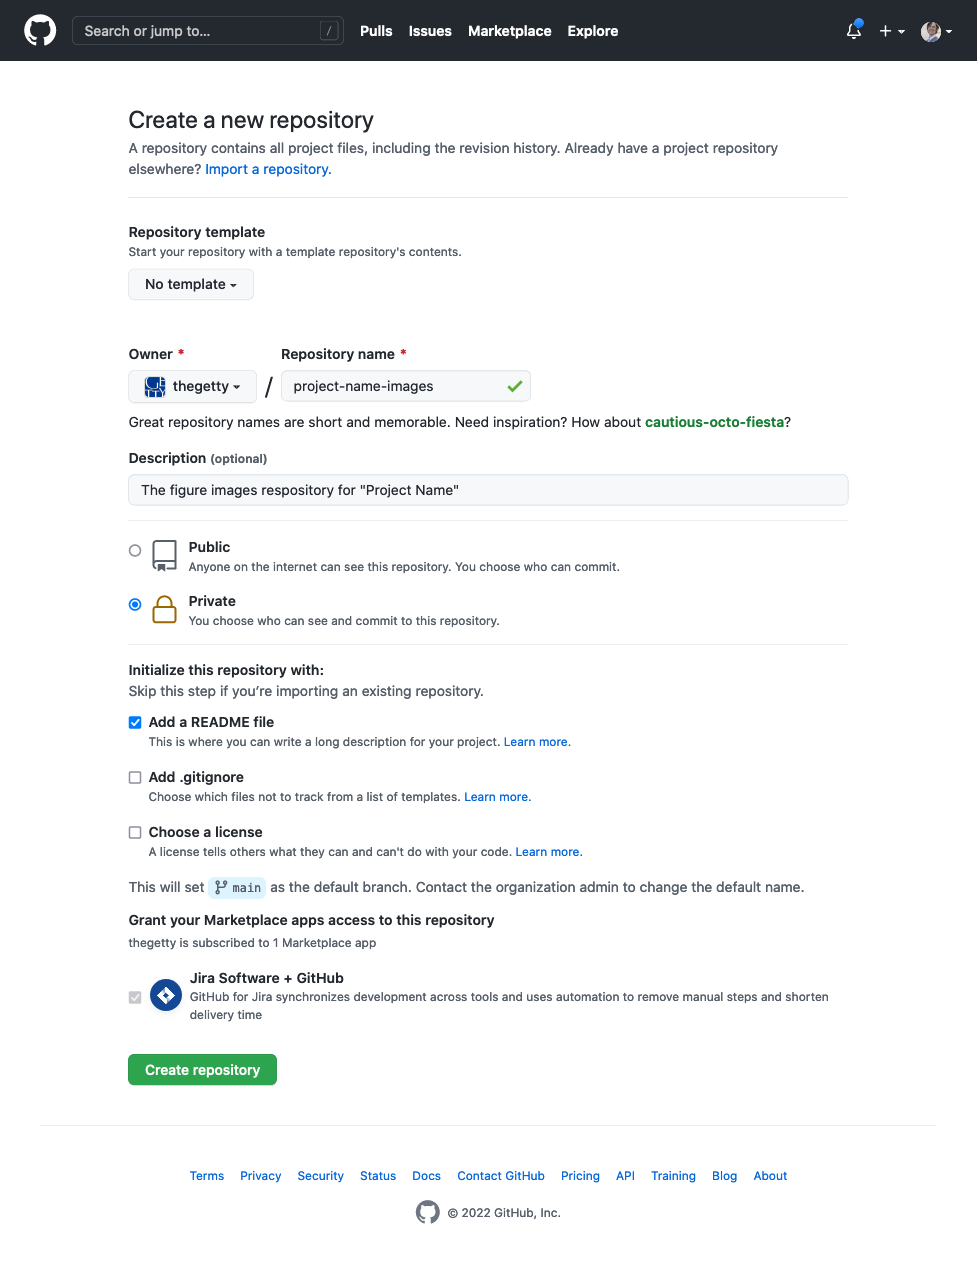
Use the interface on the Getty GitHub organization page, to create a new repository. The name should be the same as the main project repository, but with
-imagesappended. The description should be “The figure images respository for “Project Name””. It must be set as private, and a README should be included. -
Back in your local copy of the main project repository, delete the existing
content/_assets/images/figures/directory and commit the change. (Note that once you do this,quire previewandbuildwon’t work until you remove references to the deleted figures from all the demo Markdown and YAML files.) -
Run
git submodule add
                        git@github.com:thegetty/project-name-images.git
                        content/_assets/images/figures/
to add the images repository in as a submodule. (Note that the submodule should be added with SSH in order to work with Netlfiy deployment as detailed in the section below.) -
Run
cd content/_assets/images/figures/ && git lfs
                        track "*.jpg" "*.png"
                        "*.gif"
to use Git LFS on all JPG, PNG and GIF images. -
Commit the changes in both the submodule repository, and the main project repository. (To do this in GitHub Desktop, open the submodule repository with the “Add Existing Repository” option and navigate to the
content/_assets/images/figures/directory as the source, and then commit as usual. Still in GitHub Desktop, switch back to the main project repo, and commit the change.)Whenever you’re making a change in the submodule, the change needs to be committed in that repo, as well as in the main project repo. The change in the submodule repo will appear and be commited as normal, the change in the main project repo will appear as a “Subproject commit” to
content/_assets/images/figures/that is simply a git hash. The hash points to the version of the repo the submodule should point to.For more, see “Working with submodules” on the GitHub blog.
Add a Temporary “Uncorrected Proof” Banner
A banner reading “Uncorrected Proof” or similar should also be added to the site for the entire development process and until the project’s official pub date.
This can be done with CSS alone, in the project’s
content/_assets/styles/custom.css file:
/* Temporary "UNCORRECTED PROOF" Banner */
@media screen {
  .quire::before,
  .quire::after {
    color: black;
    font-weight: 700;
    position: fixed;
    width: 230px;
    height: 230px;
    z-index: 4000;
    transform: rotate(-45deg);
    text-align: center;
    padding-top: 1rem;
  }
  .quire::before {
    content: "UNCORRECTED";
    background-color: yellow;
    bottom: -115px;
    right: -115px;
  }
  .quire::after {
    content: "PROOF";
    bottom: -130px;
    right: -130px;
  }
}
Grant GitHub Access to the Publications Team
The project repository, as well as the private images repository if there is one, needs to be added to the GitHub publications team to give editors and others the access they need. This needs to be done by the team’s Maintainer, or another Getty GitHub admin.
-
Go to https://github.com/orgs/thegetty/teams/publications/repositories and select “Add Repository”
-
Search for the repository, select it, and click “Add repository to team”
-
After adding, navigate to the repo name in the list of team repositories and change access from “Read” to “Write”
Add “Forthcoming” Page Template
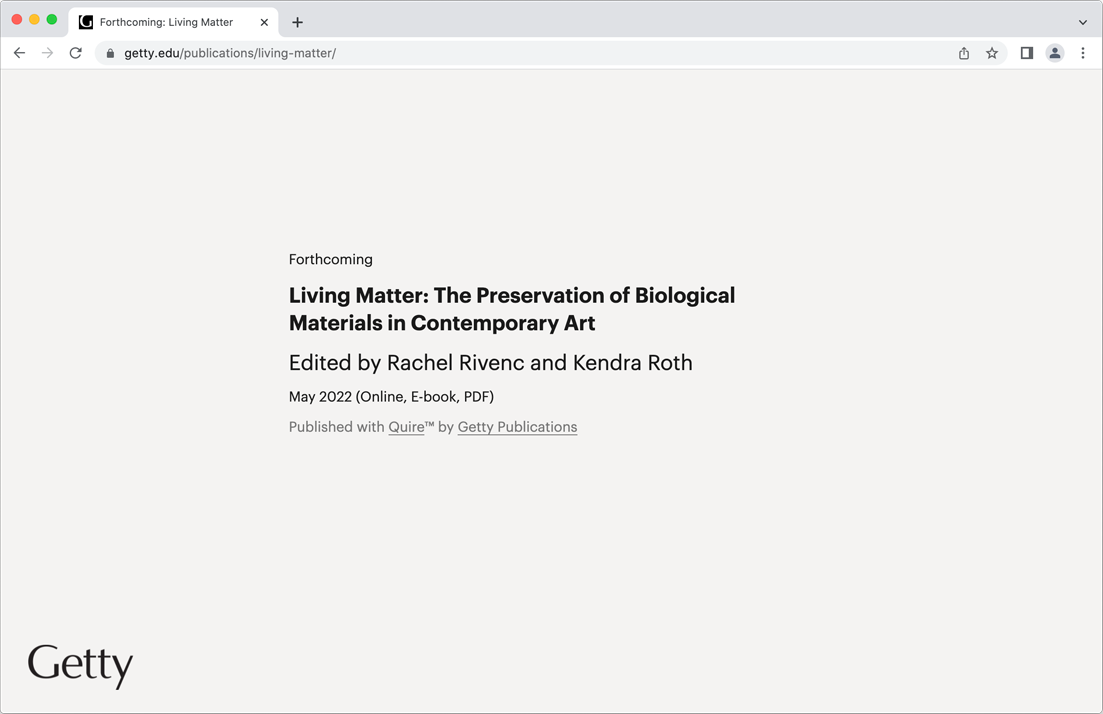
Until the book is actually published, a forthcoming placeholder page should be published on getty.edu at the book’s final URL. This page should include the book’s title, author, pub date (season, month, or day as we get closer and can say for certain), the formats that will be available, and a line that says “Published with Quire™ by Getty Publications”.
-
Create a new branch called
forthcoming -
Delete everything in the branch except for the
.gitfiles,.quire, and README.md -
Unzip the sample files and add the contents to the project
-
Update the
index.htmlfile with the project title, contributors, and pub date (as listed in Consonance) -
Commit and publish the changes
Setup Netlify Hosting
-
Switch back to the
mainbranch of the project and add thenetlify.tomlfile. Where it sayscommand = "npx @thegetty/quire-cli build"in the file, it is a good idea to also specify a version of the CLI, matching the one listed in the project’s.quirefile. -
Update the project
urlin thecontent/_data/publications.yamlfile to ‘https://main--PROJECT-NAME.netlify.app’. Commit this and the last change, and push them to GitHub. -
Go to the Getty Development team page on Netlify, use the “Add a new site” button, and select the “Import an existing project” option. This will walk you through finding the main project repository on GitHub and adjusting the permissions on it if needed. (The images repository, if there is one, doesn’t also need to be added at this point.)
When asked to review configuration for the project, make sure all the “Build settings” are blank. Under “Environment variables”, add the two variables listed below, and then click Deploy.
Key Value Notes GIT_LFS_ENABLED trueGIT_LFS_FETCH_INCLUDE .jpg, .png, .gif, .epub, .pdfShould match any file types tracked with Git LFS as set up in the steps above -
Under the “Site configuration”, choose “Change site name”, change it to match the main project repository name.
-
If the project includes a private images repository, choose “Build & deploy”, scroll to “Deploy key”, and click “Generate public deploy key”. Copy the resulting key.
Open the private images submodule repository on GitHub and go to Settings > Deploy keys. Add a key with a tile like “My Project - Netlify public deploy key”, and the paste in the key from Netlify.
Test the key by triggering a new deploy.
-
Still in the “Build & deploy” section, scroll to “Branches and deploy contexts” activate branch deploys and add individual branches:
mainfirst-pagessecond-pagesfinal-pages. Also change the “Production branch” toforthcoming, and have “Deploy Previews” set to “None”. -
Go to Deploys and use the Trigger deploy button with the option to clear cache and deploy site. Verify the deploy worked and the resulting site looks and behaves as expected.
The site at https://PROJECT-NAME.netlify.app/ should be the forthcoming page. The site at https://main--PROJECT-NAME.netlify.app/ should be the Quire site.
Set the Proxy URL
Once the Netlify hosting steps have been completed, a proxy
URL can be set up to map the Netlify URL to the final
publication URL on getty.edu. This will map to the
forthcoming branch as long as it’s set at the
Production branch. Which is the case until just prior to the
book’s publication date, as described in the
“Final Publication”
section of this guide.
To set the Proxy URL, post a ticket to the Cloud Systems Administration project in Getty’s Jira account. Following this previous ticket as a guideline: https://jira.getty.edu/browse/CSA-1613. Allow at least two weeks for completion.
This proxy URL does not need to be updated further for later stages of development or for the final publication.